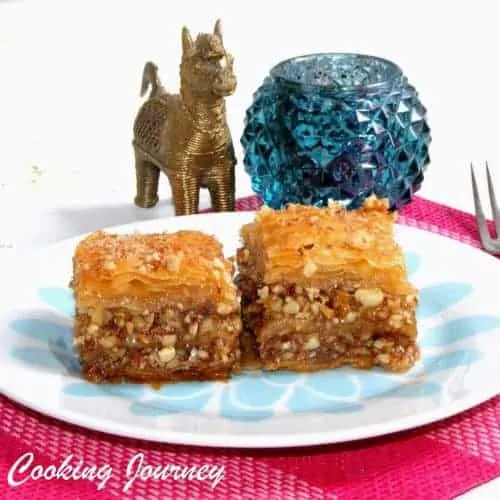
Best Homemade Baklava Recipe (Step-by-Step Guide With Phyllo)
This Homemade Baklava recipe is the best one you will ever make. The flavors are spot on, which will leave you craving for more.
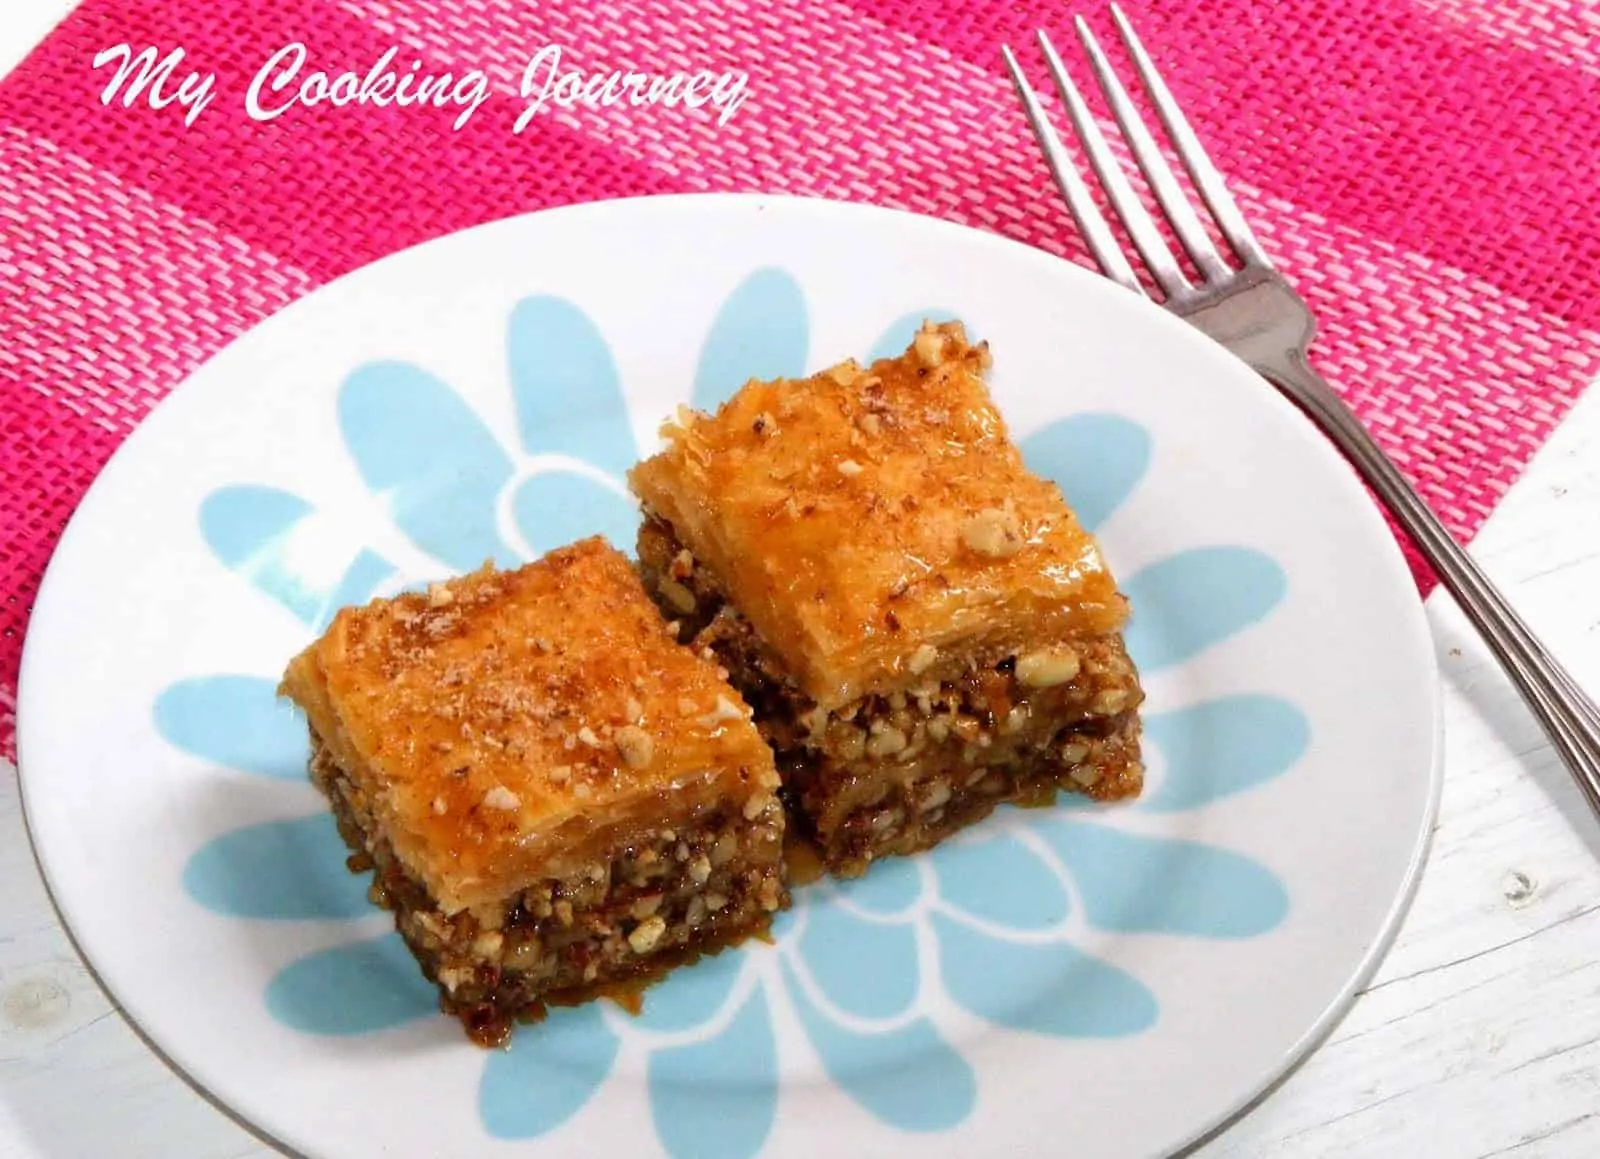
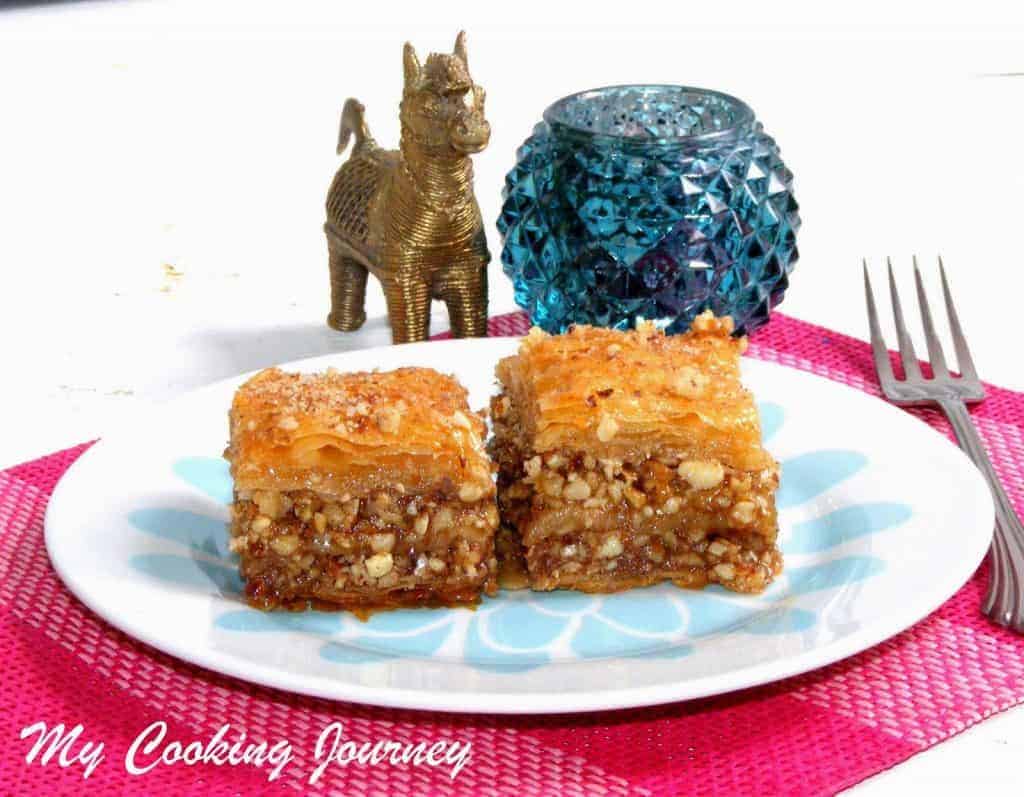
Baklava is a crispy, rich, sweet pastry made of layers of phyllo dough filled with nuts and drenched with honey syrup. This ethnic Middle Eastern confection has been in my mind for several months, and this weekend made its grand entry into my kitchen.
A few months ago, a traditional Turkish restaurant opened in our area, and it had the best Baklava I have ever tasted. Ever since I ate at that restaurant, I've wanted to make this pastry, but the labor involved has made me postpone it.
Once I actually started making it, it was not too bad. More than difficult, I would call this a labor-intensive desert. Once we get in the flow, it just gets easier. The phyllo dough used in this pastry is readily available in most supermarkets.
What Nuts to use
Traditionally, this is made of walnuts and Pistachios. Since I did not have Pistachios in my pantry, I ended up using Almonds.
I found no difference in the taste, and definitely the dessert was worth the effort. I used the recipe from one of my baking books called 'Anne Willan's Look & Cook Delicious Desserts'.

Ever since I started making this homemade baklava recipe, it has been a dessert that I love to take to parties. There is a wrong conception that baklava is very hard to make.
I want to insist again that it is a very time-consuming recipe, but definitely not hard. I had made this crispy baklava before we left New York, and my parents were visiting us then. My dad absolutely loved it, and he was all praise about how well I had made it.

Preparation time - 1 hr
Cooking time - 1hr 15 mins
Difficulty level - Difficult
Ingredients to make Homemade Baklava Recipe - Makes around 2-3 dozen, depending on the size
- Phyllo dough - 1lb package
- Unsalted butter - 1 cup
- Walnuts - 2 cups
- Pistachios (Unsalted) - 2 cups (I used 2 cups of Almonds)
- Sugar - 1 cup + ⅓ cup
- Ground cinnamon - 2 tsp
- Ground cloves - ¼th tsp
- Honey - 1 cup
- Lemon juice - from 1 small lemon
- Water - 1 cup
- Orange flower water - 3 tablespoon (Or use 1tsp of Vanilla extract)

Procedure to make a Homemade Baklava Recipe
Prepare the Nut Filling
- Coarsely chop the nuts with the chef's knife or in a food processor.
- Set aside 4 tablespoon of nuts for decoration. Put the remainder in a bowl with ⅓ cup of sugar, cinnamon, and cloves, and mix well.

How to Layer Phyllo Dough and Bake
- Heat the oven to 350°F. Lay a dish towel on a work surface and sprinkle it lightly with water. Thaw the phyllo dough package and bring it to room temperature according to the manufacturer's instructions.
- Unroll the sheets on the towel and then cover them with a second damp dish towel. When unrolling them, I encountered several cracks and cuts in the sheets. Do not panic. They are easily repairable and do not make any difference in the desert.
- Melt the butter in a small saucepan. Brush a 9 x 13-inch baking pan with melted butter. Take a sheet of phyllo dough and carefully spread it in the pan, folding the sheet in such a way that it fits the pan.
- Brush the layered sheet with butter and gently press it into the sides and corners of the pan.

- Lay another sheet on top and brush with butter. Do the same with the other third of the sheets. Once ⅓rd of the sheets have been used, scatter half the nut filling over the layers.

- Layer another third of the sheets in the pan, buttering each one and pressing into the corners and sides. Then sprinkle the remaining half of the nut mixture evenly.
- Layer the last third of the sheets, buttering them and pressing them the same way as we did with the previous layers.
- Brush the topmost layer thoroughly with butter and pour any remaining butter on the top (I ignored the last step. I did not pour the remaining butter. I just liberally brushed the top layer and left it at that).
- With a small knife, cut diagonal lines around ½ inch deep to mark out the shape. Do not press down too much when cutting.

- Bake on a low shelf for around 1 hr 15 mins (It took me exactly 1 hr) until golden.
Making the Sugar Syrup
- Combine sugar and water in a saucepan and heat until dissolved, stirring occasionally.
- Pour in the honey and stir to combine. Bring it to a boil without stirring until the syrup reaches a softball consistency (239°F on a candy thermometer). This takes anywhere from 30 minutes to 45 minutes.
- To test the consistency without the thermometer, take the pan off the heat and dip a teaspoon in the syrup. Let it cool down for a few seconds and then drop it in a small cup with water. Once dropped into the water, it should form a mushy ball.

- Remove the syrup from the heat and let it cool down to a lukewarm temperature. Now add the juice from a lemon and the orange flower water or the vanilla extract.

Finishing the Pastries
- Remove the pan from the oven and immediately pour the cool syrup evenly over the hot baklava. Pouring the syrup over the hot pastries enables better absorption. With the chef's knife, cut the baklava along the marked lines almost to the bottom of the pan. Let the pastries cool.

- Cut through the marked lines completely and carefully lift the pastries with a spatula and arrange them on a plate. Sprinkle the top with the reserved nuts and serve.
Similar Recipes
If you made this recipe and liked it, give a star rating on the recipe card or let me know in the comments below. You could also share it with me on Instagram using #MyCookingJourney and tagging me @sandhya.ramakrishnan. You could follow me and my recipes on Facebook |Instagram | Pinterest | twitter
Recipe
Best Homemade Baklava Recipe (Step-by-Step Guide With Phyllo)
Equipment
- Oven
- food processor
Ingredients
- 1 lb Phyllo dough from 1lb package
- 1 cup Unsalted butter
- 2 cups Walnuts
- 2 cups Pistachios Unsalted - 2 cups (I used 2 cups of Almonds)
- 1 ⅓ cup Sugar
- 2 teaspoon Ground cinnamon
- ¼ teaspoon Ground cloves
- 1 cup Honey
- 1 Juice of lemon from 1 lemon
- 1 cup Water
- 3 tablespoon Orange flower water Or use 1tsp of Vanilla extract
Instructions
- The procedure is split into 4 parts.
1)PREPARE THE NUT FILLING -
- Coarsely chop the nuts with the chef's knife or in a food processor.
- Set aside 4 tablespoon of nut for decoration. Put the remainder in a bowl with ⅓ cup of sugar, cinnamon and cloves and mix well.
ASSEMBLE AND BAKE THE PASTRIES -
- Heat the oven to 350 F. Lay a dish towel on a work surface and sprinkle it lightly with water. Thaw the phyllo dough package according the manufacturer's instructions. Unroll the sheets on the towel and then cover it with a second damp dish towel. When unrolling them I encountered several cracks and cuts in the sheets. Do not panic. They are easily repairable and do not make any difference in the desert.
- Melt the butter in a small saucepan. Brush a 9 x 13 inch baking pan with melted butter. Take a sheet of phyllo dough and carefully spread it in the pan, folding the sheet in such a way that it fits the pan.
- Brush the layered sheet with butter and gently press it into the sides and corners of the pan.
- Lay another sheet on top and brush with butter. Do the same with the third of the sheets. Once ⅓rd of the sheets have been used, scatter half the nut filling over the layers.
- Layer another third of the sheets in the pan, buttering each one and pressing into the corners and sides. Then sprinkle the remaining half of the nut mixture evenly.
- Layer the last third of the sheets, buttering them and pressing them the same way as we did with the previous layers. Brush the top most layer thoroughly with butter and pour any remainder of butter on the top (I ignored the last step. I did not pour the remaining butter. I just liberally brushed the top layer and left it at that).
- With a small knife, cut diagonal lines around ½ inch deep to mark out the shape. Do not press down too much when cutting.
- Bake on low shelf for around 1 hr 15 mins (It took me exactly 1 hr) until golden.
Making the Sugar Syrup -
- Combine sugar and water in a saucepan and heat until dissolved, stirring occasionally. Pour in the honey and stir to combine. Boil without stirring until the syrup reaches a soft ball consistency (239F on a candy thermometer). This takes anywhere from 30 mins-45 mins. To test the consistency without the thermometer, take the pan off the heat and dip a teaspoon in the syrup. Let it cool down for few seconds and then drop it in a small cup with water. Once dropped into the water, it should form a mushy ball.
- Remove the syrup from the heat and let it cool down to lukewarm temperature. Now add the juice from a lemon and the orange flower water or the vanilla extract.
FINISH THE PASTRIES -
- Remove the pan from the oven and immediately pour the cool syrup evenly over the hot pastries. Pouring the syrup over the hot pastries enables better absorption. With the chef's knife cut along the marked lines almost to the bottom of the pan. Let the pastries cool.
- Cut through the marked lines completely and carefully lift the pastries with a spatula and arrange them on a plate. Sprinkle the top with the reserved nuts and serve.


A super recipe for a delicious desert. Lots of detail here. Can’t wait to try your homage Baklava dish. It looks yummy!
This was such a delicious dessert recipe! It came out the oven perfectly browned and crisp!
Such a delicious and easy dessert to make.
This is perfect for my sister's birthday!
Wow! This is such an awesome dessert dish with Phyllo pastry sheets and nuts! Plus the Honey sauce makes it so enticing and tempting! Such a unique dish that everyone must try! Totally love it!
This Baklava is absolutely addictive! I have made it twice already and each time it gets eaten so quickly. Thanks so much for another delicious recipe share.
I love baklava and this recipe did not disappoint, so sweet and delicious! Love the combination of walnuts and pistachios.
This dessert is such a treat because it's so hard to find! Love how easy your recipe is and it will be such a hit in our house.
We can't resist baklava. The recipe you shared is perfect, full of nutty flavor! Thanks
Always on my mind too. You have made it so easy with all the detailing. Perfect crispy and juicy and nutty . Yummy after every meal.
Can these be frozen?
I have not tried freezing them. You could freeze them before adding the sauce and then when ready to serve, heat it through in the oven and pour the sauce when warm.
This has become my go to recipe for baklava’s. Looking at the process was reluctant to try. Finally gathered courage and made these and it has been a go to dessert ever since!! The whole house smells heavenly after making them!! We enjoyed it so much I made a batch for family back home and sent it through my parents!
Thank you so much Sandhya for this wonderful dessert! No more store bought baklava’s 😀
Anusha, thanks a lot for trying the recipe and letting me know 🙂 This is one of my greatest victory as we love baklava and getting it to taste like it should took me a few trials and errors. No more store bought baklavas is correct! And also try it with different nuts to change up the flavor a bit.
In the recipe you have mentioned about Phyllo dough. Can you please share a link about the specific one that you have used. I looked through it but there are many options it’s a bit confusing. Thanks
Hi Ruchika, I use the Athen brands of phyllo sheets. I have always used them and it is easily available in any grocery stores in US.
I have never made it before it’s my first time. I went to buy it but there were quite a few options. Got confused. Can you please share the pick of the box that you use. Thanks
Thanks Nithya! It was actually pretty easy to take it out. I used a pizza lifter to take it out. I am going to make more this weekend. will let you know how it worked out 🙂
My, oh my. I love this dessert but I'm really scared to try it because it looks quite tricky.
Can you please tell me how you managed to get the baklavas out of the tray without breaking them? That's probably my greatest worry - that it will fall apart!
very new to me..but looks awesome...bookmarked it..
Thanks Srividhya !! We used to always eat this dessert in a Greek restaurant here and I was really looking forward to make this. Was not hard to make and was close in flavors to an authentic Greek recipe 🙂 Do give it a shot and let me know. Thanks for following 🙂
Sandhya
Hi Sajina,
Thanks for sending this lovely and very difficult Turkish dessert to my event!!! But the archive post should be reposted in OCT 2012. Please repost this recipe in OCT 2012. Thanks
Sowmya
Ongoing Event - Healthy Foods for Healthy Kids - Combo Meals
Ongoing Event + Giveaway - CEDD – HONEY
Hi sowmya, missed that out. Will do it now 🙂
Sandhya
Really lovelyy..i usually have such desserts since im in dubai..n i love em...mouth watering pics..superb !!!
Never tried or even heard of phyllo dough earlier..
https://sajinastastes.blogspot.com
Thanks a lot Sajina 🙂 This was my first expereince with phylo dough too. I really love the texture that the phyllo dough have. Do give it a shot and let me know how it came out 🙂
Sandhya
Rich Dessert
Hi Jaleela,
It is a rich desert, but made us go back it over and over again 🙂
Sandhya
A GREAT POST. Love the step by step instructions for this difficult to make delicious dessert!
Well done
Dave
erecipeCards.com
Thanks Dave 🙂 Missed seeing your comments earlier. Keep them coming 🙂
Cheers,
Sandhya
Thanks so much for the step by step. Would love to try making my own. Great looking recipe.
Thanks for the feedback:) Do let me know, how they were once you try them 🙂
Cheers,
Sandhya