Victorian Milk Bread Recipe
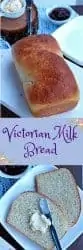
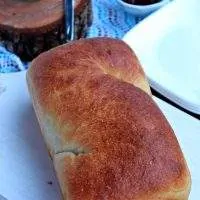
Victorian Milk Bread just substitutes milk instead of water in a regular bread recipe. The result is this amazingly flavorful bread with a beautiful crust and a great crumb.
When deciding on the recipe for V, I made up my mind, that I wanted to bake something. I have not baked any bread for this Mega BM. I was struggling to find a recipe to fit my theme and that is when this Victorian Milk Bread popped into my head.

A few weeks ago, one of my very dear friends who is the Director of the Public library of my town in NY, posted a bread she baked. I loved how beautiful the loaf looked. She had also baked the bread in a Pullman Bread pan which immediately caught my attention.
I bought a Pullman pan to make loaves of square bread that would resemble the store bread. The first recipe I tried totally flopped and the bread did not hold its shape. I stopped using the pan ever since and it is still sitting on my shelf, untouched for over a year now.
I asked my dear friend Gloria for the recipe and she sent a picture of the recipe from the book that she uses. The name of the bread is Victorian Milk Bread and it perfectly fits my need for the alphabet V. She said that she almost doubles the bread to make it in the Pullman loaf.
I did not want to try it on the first attempt and hence used the recipe to make the standard loaf. I also managed to shape the bread into the traditional 'S' shape that was mentioned in the book.

The book she sent the recipe from was called 'Bread by Eric Treuille'. This British bread uses milk instead of water. Being from India, I love milk bread, as that is what is very common there. I have baked Milk bread before using the Tangzhong method.
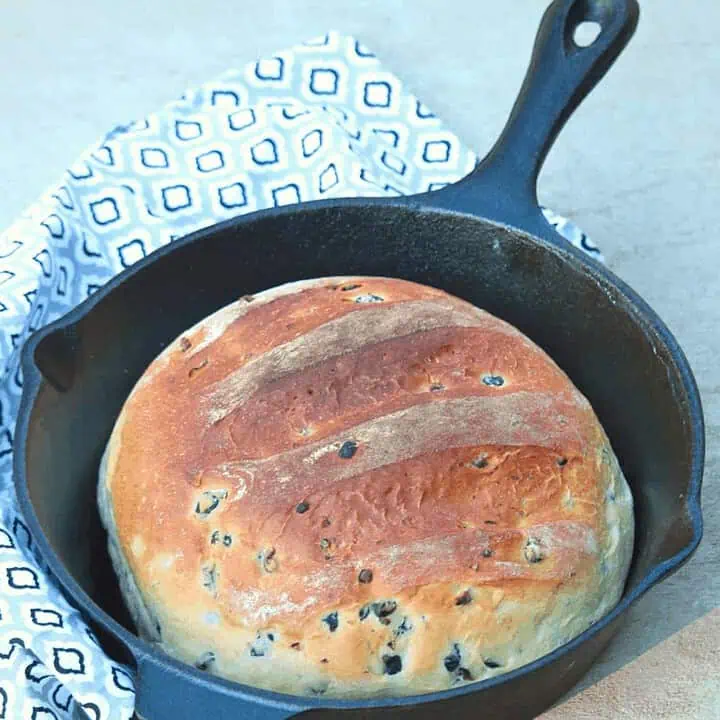
This bread is much simpler than that and does not include making a roux or anything. We just substitute Milk instead of water in a regular bread recipe and proceed. The result is this amazingly flavorful bread with a beautiful crust and a great crumb.
Egg wash is highly recommended for the beautiful golden color of the crust. I have almost always used a butter and milk mixture to attain that same golden color. I have used the same here instead of egg wash and the bread has a beautiful color.
The recipe also has a 3 rise instead of 2. The dough is punched down once in between the initial rise and then allowed to rise again. It does not take long though. My dough had risen in 45 minutes and I punched it down and let it rise again for 45 minutes or so to allow it to double in volume. It was fun to shape the 'S' shape of the bread. The bread can however be shaped into a traditional loaf.
My Other Posts in the A - Z Explore the Flavors Series
Preparation time - 10 minutes plus 2 ½ hours of resting time
Baking time - 30 to 40 minutes
Difficulty level - Easy

Ingredients to make Victorian Milk Bread - Makes one standard 8 x 5 loaf
- Bread flour (All Purpose flour can be used as a substitute) - 3 ¼ - 3 ½ cups
- Milk (lukewarm) - 1 ¼ cup (might need a little more)
- Active dry yeast - 2 tsp
- Sugar - 1 tbsp
- Salt - 1 ½ tsp
- Butter + milk - 1 teaspoon + 2 tablespoon (for brushing on top)

Procedure to make Victorian Milk Bread -
Making the dough -
- I used a kitchen aid stand mixer to knead my dough. You can also knead it by hand. In a large bowl or the bowl of your mixer, measure the flour and salt and combine.
- In a measuring cup, heat the milk. Use half of the warm milk to add the sugar and the yeast and mix. Let the yeast proof for about 5 minutes. You will see that the yeast mixture becomes frothy and bubbly. If the yeast does not activate by around 10 minutes, then the yeast is old and is not active. Discard this yeast and start with a new batch.

- Once the yeast mixture has been proofed, add it to the flour and mix. Add the remaining warm milk and start kneading. If kneading using the stand mixer use the hook attachment and knead for 8 to 10 minutes. Adjust the consistency of the dough by using a little bit more milk or flour.
- The dough should be very soft, but not sticky. I kneaded for a bit in the stand mixer and then kneaded by hand until I reached the desired texture.

- Grease a large bowl (I used my mixer bowl), and place the kneaded dough in the bowl. Cover with a kitchen towel and let it rise until doubled (about 45 minutes).
- Punch down the dough and let it rise again until doubled in volume (about 45 minutes).

Shaping and Baking the Bread -
- Once the dough rises for the second time, place it on the work surface.
- Spread it into a rough rectangle and roll it to a tight log about 14 inches long.
- Twist both the edges of the log to form an 'S' shape and tuck in the edges. (refer to the picture for the S shape)
- Prepare a standard loaf pan by lightly greasing it. Place the shaped bread into the prepared tin and cover it with a kitchen towel.

- Let the shaped bread rise until it reaches above the tin. It took me about 45 minutes.

- At the end of the rising time, preheat the oven to 400 F.
- In a small bowl, melt 1 teaspoon of butter and add 2 tablespoon of milk to it. Brush this mixture over the bread liberally.

- Bake the bread for about 30 to 35 minutes or until the top of the bread is golden brown.
- Keep an eye out for about 25 minutes. If the top starts to become brown too quickly, tent the tin with aluminum foil and let it bake further.
- The bread would sound hollow when completely done. Remove the bread and let it completely cool on a wire rack before slicing.

Similar Recipes

If you made this recipe and liked it, give a star rating on the recipe card or let me know in the comments below. You could also share it with me on Instagram using #MyCookingJourney and tagging me @sandhya.ramakrishnan. You could follow me and my recipes on Facebook |Instagram | Pinterest | Twitter/X
Recipe
Victorian Milk Bread
Equipment
- Stand Mixer
- Oven
Ingredients
- 3 ¼ cup Bread flour All Purpose flour can be used as a substitute
- 1 ¼ cup Milk lukewarm
- 2 teaspoon Active dry yeast
- 1 tablespoon Sugar
- 1 ½ teaspoon Salt
- 1 teaspoon Butter + milk 1 teaspoon + 2 tablespoon for brushing on top
Instructions
Making the dough -
- I used kitchen aid stand mixer to knead my dough. You can also knead it by hand. In a large bowl or the bowl of your mixer, measure the flour and salt and combine.
- In a measuring cup, heat the milk. In half of the warm milk, add the sugar and the yeast and mix. Let the yeast proof for about 5 minutes. You will see that the yeast mixture becomes frothy and bubbly. If the yeast does not activate by around 10 minutes, then the yeast is old and is not active. Discard this yeast and start with a new batch.
- Once the yeast mixture has proofed, add it to the flour and mix. Add the remaining warm milk and start kneading. If kneading using the stand mixer use the hook attachment and knead for 8 to 10 minutes. If the dough appears too dry, add a little bit more milk. If the dough appears too sticky, add a little more flour.
- The dough should be very soft, but not sticky. I kneaded for a bit in the stand mixer and then kneaded by hand, until I reached the desired texture.
- Grease a large bowl (I used my mixer bowl), and place the kneaded dough in the bowl. Cover with a kitchen towel and let it rise until doubled (about 45 minutes).
- Punch down the dough and let it rise again until doubled in volume (about 45 minutes).
Shaping and Baking the Bread -
- Once the dough rises for the second time, place it on the work surface.
- Spread it to a rough rectangle and roll it to a tight log about 14 inches long.
- Twist both the edges of the log to form a 'S' shape and tuck in the edges. (refer to the picture for the S shape)
- Prepare a standard loaf pan by lightly greasing it. Place the shaped bread into the prepared tin and cover with a kitchen towel.
- Let the shaped bread rise until it reaches above the tin. It took me about 45 minutes.
- At the end of the rising time, preheat the oven to 400 F.
- In a small bowl, melt 1 teaspoon of butter and add 2 tablespoon of milk to it. Brush this mixture over the bread liberally.
- Bake the bread for about 30 to 35 minutes or until the top of the bread is golden brown.
- Keep an eye from about 25 minutes. If the top starts to become brown too quickly, tent the tin with a aluminum foil and let it bake further.
- The bread would sound hollow when completely done. Remove the bread and let it completely cool on a wire rack before slicing.
wow beautiful loaf sandhya! lovely color and beautiful texture! i m missing baking so badly! sitting in chennai, alli can do is drool at such beautiful bakes!
You have shaped teh bread so well Sandhya!The milk bread is indeed so soft! I too have a pullman pan and it is still sleeping on the shelves.
OMG that is an amazing bread Sandhya. Trust you to pick a fantastic one for us to drool over!..and that s shape looks so neatly done. I am surely going to try this soon. what a lovely recipe!
Oh My gosh !! this S shaped bread is so perfect, you nailed baking them.. I can see the perfect texture and so soft they are.. The crust look fantastic !! Kudos !!
I am yet to try milk bread and this Victorian milk bread looks just perfect to try my hands on. Love the beautiful golden crust and delicious crumb.
That is a perfect loaf Sandwich. Beautifully golden crust and such amazing crumbs. Well done. Bookmarked to try some time soon.
That is an amazing golden crust and nice crumb. Love how you have shaped it into S. Milk in the bread dough gives such a soft and flavourful bread..
I can understand how a person struggles to fit in a recipe in the theme, and I must say you have done an amazing job with this bread. It has a beautiful S..and the texture looks fantastic..nice and soft.
What a great try and you have succeeded for sure. That S shape has come out well even after the 3 rises. Perfect texture. Glad you got to bake for the BM. Super Sandhya.
Wow, the bread looks fantastic, Sandhya. The Shape "S" has turned out so well and it looks so soft !!! Look at the sliced bread, it's just like the store brought one, perfect texture. You have nailed it on this attempt !!!
The bread looks very pretty Sandhya. I am yet to try my hand at baking the regular bread at home. This one sounds like a good one to start off. Shall bookmark it.
How pretty this milk bread looks and that 'S' shape looks marvellous. Prefect crust with spongy crumb, lovely bread there. Wish i get few slices to kick start a day.