Grissini | Traditional Italian Breadsticks
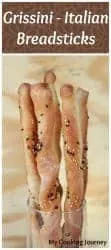
Grissini is a delicious and easy Italian breadstick that is long, twisted, and crunchy. It is often enjoyed as an appetizer or served along with the soup. Bake a batch to enjoy with warm soup for dinner.
When thinking about breadsticks, the first thing that comes to my mind is the soft breadsticks that they serve at Italian restaurants.

My family is greatly addicted to the breadsticks that they serve at Olive Garden that I ended up making my own at home to enjoy often. When reading about this particular recipe, Grissini, I came to know that this is how traditional Italian breadsticks look.
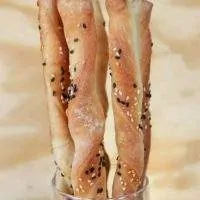
Grissinis are these long, twisted, and crispy breadsticks often studded with sesame seeds that are enjoyed as an appetizer with a bowl of soup or wine or as a snack.
Just reading about the breadsticks, I was thinking more like the tiny breadsticks that they serve at restaurants in India along with soup. But these Grissinis were long and very flavorful when compared to those.
History of Grissini
A little history before we get to the actual recipe of the Grissini. Grissini originated in the Turin/Torino region of Northwest Italy. It was invented around the end of the 17th century by a baker in Turin to help a Young duke who had trouble digesting food.
The court doctors had asked the baker, Antonio Brunero to create something that the young duke could digest. He used the Ghersa dough ( a thin bread of Italy) to stretch out and make these breadsticks, called the 'Ghersino'. Later the Ghersino became the 'Grissini'.
Kinds of Grissini
Grissinis are of two kind, Grissini Stirato (Straight Grissini) and the Grissini Rubata (Rolled Grissini). There are many flavorings and variations that we can make with the same dough to make different varieties of grissini.
We can make the Grissini very thin and crisp or slightly thicker and softer. The original Torinese Grissini is handmade and slightly thicker and on the softer side.

The Grissini can be made in a few different ways. They could be made by pinching off tiny pieces of dough and then rolling them out to form thin ropes. These ropes can be left as is or twisted a bit to give a shape. The other way, which I adopted is to roll the dough into a rectangle and then cut off strips of dough which are then rolled to form a twisted rope.
The dough to make the grissini is pretty basic and is made with flour, yeast, salt, water (or sometimes milk), and some oil. The sesame seeds are optional and I used both the black and white seeds to give some color to the bread. The bread is very fun to make and will make for a great baking project with children.
My other bakes
A for Almond cookies from China
B for Bretzel Rolls from Germany
C for Chocolate Cupcakes with Chocolate Buttercream Frosting from USA
D for Danish Cookies from Denmark
E for Empanada from Argentina
F for Franzbrötchen from Germany
Preparation time - 20 minutes plus about 2 hours of resting time
Baking time - 12 - 14 minutes per batch
Difficulty level - intermediate

Ingredients to make Grissini
- All Purpose flour - 1 ½ cups
- Milk powder - ½ tbsp
- Instant yeast - 1 tsp
- Sugar - 1 tsp
- Salt - ¾ tsp
- Olive oil - 1 tbsp
- Water (lukewarm) - ⅓ cup (might need a little more or less)
- Milk - for brushing the rolls
- Sesame seeds (white and black) - for garnish
Procedure to make Grissini
To make the Dough
- Combine the dry ingredients (flour, yeast, sugar, salt and milk powder) in the bowl of the mixer.

- Add the olive oil and the lukewarm water to the dry ingredients with the machine running and mix to form a soft dough. Add the water slowly to make sure we don't add too much.
- Knead the dough using the hook attachment until a very soft dough forms which starts pulling out from the sides of the bowl (about 8-10 minutes). The dough will be tacky, but will not be sticky.
- Transfer the dough to a greased container. Cover it with plastic wrap and then a kitchen towel and keep it in a draft free place to proof (about 1 - 1 ½ hours).

To shape the Dough
- Once the dough has risen, place it on the work surface and punch it down a bit to get rid of excess air.
- Using a rolling pin, roll the dough into a 9 x 13 rectangle. Try to keep the edges neat when rolling the dough and also try to keep it even in thickness.
- Brush the surface of the dough with milk.
- Sprinkle the sesame seeds evenly through the rectangle. Lightly roll the rolling pin over the seeds for them to stick to the dough. If you are not a big fan of seeds, feel free to leave them out.
- Using a pizza cutter, cut out about 16 strips from the dough. I marked my strips lightly and then made the final cut to keep them as even as possible. This helps in even baking.

- Now take each strip and give it a quick twist all along and place them in a parchment lined baking sheet. Repeat with all the strips and place them slightly spaced in the baking sheet.

- Cover with greased plastic sheet and let it rise again for about 45 minutes to an hour or until they are puffy.
Baking the Grissini
- Preheat the oven to 425 F.
- Place the baking sheet in the middle rack of the oven. Bake for 12 to 14 minutes or until they are golden.
- Let the Italian breadsticks cool a bit and then enjoy!

Other Appetizer Ideas

If you made this recipe and liked it, give a star rating on the recipe card or let me know in the comments below. You could also share it with me on Instagram using #MyCookingJourney and tagging me @sandhya.ramakrishnan. You could follow me and my recipes on Facebook |Instagram | Pinterest | Twitter/X
Recipe
Grissini | Traditional Italian Breadstick
Equipment
- Oven
- food processor
Ingredients
- 1 ½ cups All Purpose flour
- ½ tablespoon Milk powder
- 1 teaspoon Instant yeast
- 1 teaspoon Sugar
- ¾ teaspoon Salt
- 1 tablespoon Olive oil
- ⅓ cup Water lukewarm (might need a little more or less)
- 2 tablespoon Milk for brushing the rolls
- 1 tablespoon Sesame seeds white and black - for garnish
Instructions
To make the Dough -
- Combine the dry ingredients (flour, yeast, sugar, salt and milk powder) in the bowl of the mixer.
- Add the olive oil and the lukewarm water to the dry ingredients with the machine running and mix to form a soft dough. Add the water slowly to make sure we don't add too much.
- Knead the dough using the hook attachment until a very soft dough forms which starts pulling out from the sides of the bowl (about 8-10 minutes). The dough will be tacky, but will not be sticky.
- Transfer the dough to a greased container. Cover it with plastic wrap and then a kitchen towel and keep it in a draft free place to proof (about 1 - 1 ½ hours).
To shape the Dough -
- Once the dough has risen, place it on the work surface and punch it down a bit to get rid of excess air.
- Using a rolling pin, roll the dough into a 9 x 13 rectangle. Try to keep the edges neat when rolling the dough and also try to keep it even in thickness.
- Brush the surface of the dough with milk.
- Sprinkle the sesame seeds evenly through the rectangle. Lightly roll the rolling pin over the seeds for them to stick to the dough. If you are not a big fan of seeds, feel free to leave them out.
- Using a pizza cutter, cut out about 16 strips from the dough. I marked my strips lightly and then made the final cut to keep them as even as possible. This helps in even baking.
- Now take each strip and give it a quick twist all along and place them in a parchment lined baking sheet. Repeat with all the strips and place them slightly spaced in the baking sheet.
- Cover with greased plastic sheet and let it rise again for about 45 minutes to an hour or until they are puffy.
Baking the Grissini -
- Preheat the oven to 425 F.
- Place the baking sheet in the middle rack of the oven. Bake for 12 to 14 minutes or until they are golden.
- Let them cool a bit and then enjoy!

Hi sandhya.
I'm a beginner baker. Love all you baking recipes. Tried your grissini. Turned out really soft but i couldn't achieve the color over the front side of the grissini. The cak part was cooked well to brown color but the front side looked white. Where I'm i doing the mistake ?
Perfectly made Grissini Sandhya -- they look so crispy and delicious.
Grissini seems to be the star of the day. Yours turned out so crisp and perfect.
Oh wow - Love the idea of this series/marathon! I don't think I've ever tried grissini before but I definitely want to now ?
I can practically taste these breadsticks from the pictures! They look so delicious and crispy <3
Well, this recipe came in just the right time. I'm having a big party this weekend, and I was looking for some snacks ideas. Grissini is the ultimate BEST party food. Your Grissini looks fantastic. Wish I can hire you to make me some heheh 😉 Saving this!
These breadstick with go amazingly with a bowl of soup !The breadsticks wonderful! I’m definitely making this soon! ?
There is nothing quite like a wonderful breadstick with an Italian dinner! These look delicious!
Oh these look so cute and delicious too. I've had them along with soups in restaurants but never tried making at home. The recipe looks so simple that I'd definitely give it a try.
I love breadsticks! These look terrific,I can see them being great on their own or with a little bit of dip.
What an awesome idea to bake around the world and choose a delightful treat from each country. I am enjoying this yummy series and love each and everyone of them!
Your Grissini is really great, crispy bead goes well with drinks and soup. you made it perfectly. I need to try.
Grissini are great, aren't they? Olive Garden's though are basically bread dough in long sticks. But, believe me, I don't complain, I still dig in. I do like them crispy -- like yours. That's the way the Italians eat them. You're doing a great job on your alphabet.
Who doesn't love breadsticks? They look delicious, especially with those sesame seeds!
I love crispy breadsticks and these look so delicious! Love the additional texture the sesame seeds would add.
Every time I visit ur blog ur around the world recipes amaze me. My son loves snacks like this which he can hold and eat . I m sure he won't make this mess with this? I should try
Well I am a bread fanatic. Nothing beats the aroma of fresh baked bread. These look and sound fantastic. I would devour these...so I would have to make lots!!
I like the addition of sesame. Well explained and nicely captured:) I tasted very long back in Italian restaurants. They tastes good.
I usually always buy these.. but you make them look so easy I sure want to try them at home now. Love the black sesame seeds..
Breadsticks the magic word! I have never baked them just buy them at the bakery store but now I must make them using all your tips.
Grissini is my favorite part of Italian restaurant tables! These look fabulous. I want to eat allll of them.
These look really awesome. Probably better than anything I've seen at the Olive Garden. I bet they'd pair really nicely with a big green salad 🙂
Love all your grissini version. Amazing click... Those twists are looking perfect.
Wow your Grissini have really turned out so good..love how beautifully you have clicked the pictures..had I not landed with mine in a chance, it would have been Grissini only!
Grissini is the keeper recipe of the day.. Awesome bake.. Perfect with some soups!!
I am just looking at the pics sandhya. Absolutely beautiful. Perfectly twisted and baked grissini
they look so pretty and i think the proofing has been done perfectly coz it is of apt size for thickness..lovely pictures
Yay to the Grissini! Your sticks have turned out beautifully....love the sesame seeds version of them. It has become a family favourite here too....yum!
Yup totally agree, Grissini rules the day!! These look so appealing and great clicks!
So Grissini is a the star bake of the day, so many versions of grissini. Sandhya am in love with those prefectly rolled grissini and your clicks rocks yaar.
Sandhya it's Grissini Day ;like minded friends think alike, no wonder so many versions of these sticks. I am amazed at the clicks..they are so good, it is so difficult to capture such tall sticks.. and the sticks , i am loving them with those black and white specks..making them look so pretty. Fantastic Sandhya.