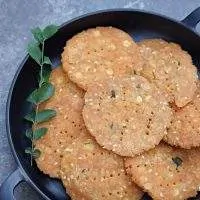
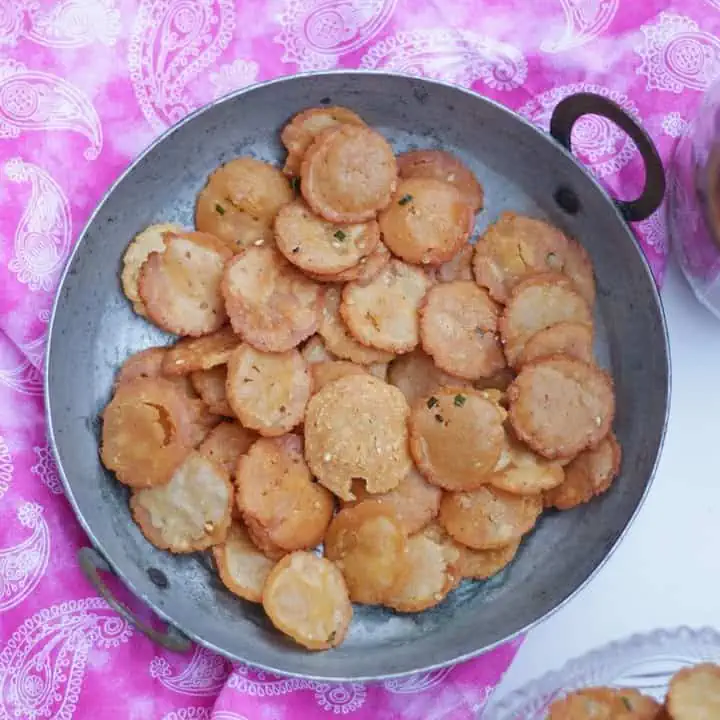
Thattai Recipe | How To Make Thattai
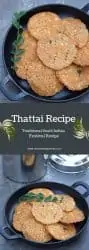
Thattai is a crispy and flavorful, traditional South Indian snack that is made for several festivals.
Thattai is a popular snack in South India made for several festivals. It is made especially for Krishna Jayanthi / Gokulashtami / Janmashtami festival and Diwali. Like any other traditional snack, Thattai is a little time-consuming to make, but it is not a hard process at all.

These days, it is very easy to get sweets and snacks from stores, but there is nothing like making them at home. Thattai tastes so much better and fresher when made at home.
As the kids are growing up, I feel that there is more and more necessary to make traditional Indian snacks for them. I am blessed to have kids who love Indian food and feel very connected to their roots.
When making traditional snacks like this, I think back to my childhood days and cherish my memories by sharing those stories with them.
This year for Krishna Jayanthi, I made thattai and Therattipaal. Therattipaal aka milk fudge happens to be baby Krishna's favorite and also my boys. I grew up loving this milk sweet made from fresh cow's milk.
My grandmother would stir the milk for hours and make this delicious Therittipaal for us every time we to our village.

Whenever I think of what savory snack to make, Thattai takes the first preference. I love the crispy thattai and is definitely much easier than many other traditional snacks.
I don't make a big batch at once and instead, make smaller batches at regular intervals. Homemade rice flour works best for making Thattai, but we can use good quality store-bought rice flour as well. Just ensure that you sieve the flour well before using it.
Preparation time - 30 Minutes
Cooking time - 2 hours
Difficulty level - Intermediate
Ingredients to make Thattai - Makes about 25
- Rice flour - 1 cup
- Urad dal flour/ullutham maavu - 1 ½ TBSP
- Roasted gram flour - ¼ cup
- Bengal gram dal / kadalai paruppu - 2 TBSP
- Coconut - 2 tablespoon (grated)
- Chili powder - 1 ½ teaspoon (adjust based on your spice preference)
- Asafetida - ½ tsp
- Ellu/White Sesame - 1 TBSP
- Salt - to taste
- Karuvepillai / Curry leaves - few
- Butter - 1 ½ TBSP
- Oil - To deep fry

Procedure to make Thattai -
To make the urad dal flour / ullutham Maavu -
- Ullutham podi is used for many savory snacks during the festival season. If you are planning to make a couple of dishes involving this, I would suggest that you make a big batch and store it in an air-tight container.
- To get ¼ cup of urad dal flour, I used about ½ cup of Urad dal.
- Fry the urad dal until brown and let it cool down.
- Grind it to a very smooth powder and sieve it.
- Again grind the coarse remaining dal and sieve it again. Use the fine powder to make the thattais.

To make Roasted Gram Flour / Pottu kadalai Maavu -
- Slightly warm the pottu kadai/roasted gram (for about 2-3 mins).
- Cool it down and grind it to a smooth powder. Sieve it and use the fine powder in the recipe.

To Make the Thattai Dough -
- Soak the Bengal gram dal for about an hour.
- Roast the rice flour until it is hot and aromatic. The rice flour does not have to change color, but it has to be hot to the touch. Sift the roasted flour and place it in a large bowl.
- Add all the flours, drained Bengal gram dal, coconut, salt, red chili powder, sesame, asafoetida, and chopped curry leaves to the same bowl. Mix it well.
- Now add the butter and using your hands mix everything well until it resembles bread crumbs.
- Slowly sprinkle water to this mixture and bring it all together to form a smooth dough.

How to shape the Thattai -
- Spread a large, clean cotton cloth on the countertop. I use a cotton veshti.
- Make small balls (as big as key lime) and place them between 2 parchment papers. You can also use a thick plastic sheet and grease it to shape the thattai.
- Use your fingers initially to flatten and then using a flat bowl or your palm flatten it entirely to form a thin disc.

- Place the shaped thattai on the cotton cloth.
- Do the same with the rest of the dough and leave them on the cloth until they are ready to fry. Doing this ensures that all the excess moisture is dried from the thattai, which results in a crispy thattai.
- Prick a few holes in the thattai with a fork. This ensures that the Thattai does not puff up when frying.

- In the meantime, heat the oil in a wide pan. Once the oil is heated through, lower the heat to low. Slowly slide the shaped and dried thattai into the oil.
- Depending on the size of the pan, you can fry 3 to 4 thattai at the same time.

- Slightly increase the heat and fry them until light brown. Remove it on a paper towel and then transfer it to a container. Repeat the same for the rest of the dough.
- Once cooled completely, store them in an air-tight container.

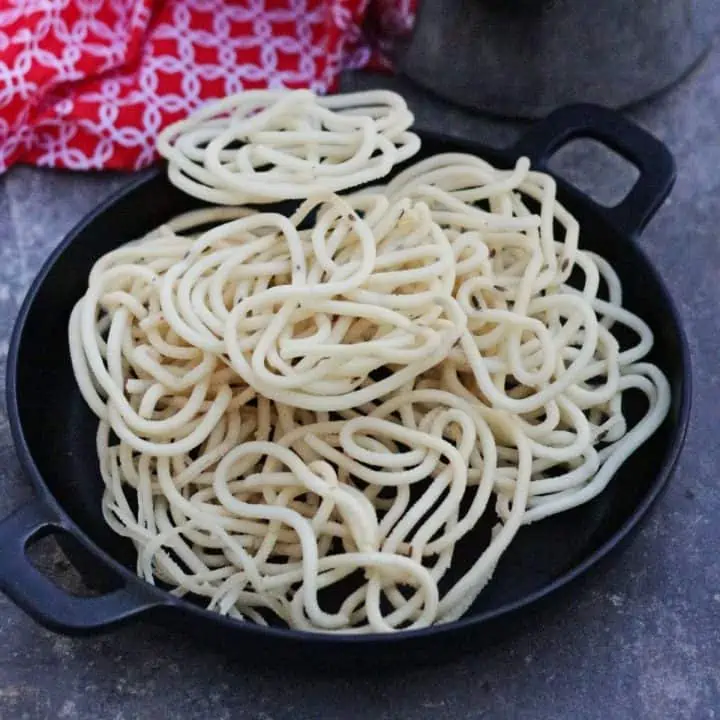
Other Snack Ideas
If you made this recipe and liked it, give a star rating on the recipe card or let me know in the comments below. You could also share it with me on Instagram using #MyCookingJourney and tagging me @sandhya.ramakrishnan. You could follow me and my recipes on Facebook |Instagram | Pinterest | Twitter/X
Recipe
Thattai Recipe
Ingredients
- 1 cup Rice flour
- 1 ½ tablespoon Urad dal flour/ullutham maavu
- ¼ cup Roasted gram flour
- 2 tablespoon Bengal gram dal / kadalai paruppu
- 2 tablespoon Coconut grated
- 1 ½ teaspoon Chili powder adjust based on your spice preference
- ½ teaspoon Asafetida
- 1 tablespoon Ellu/White Sesame
- to taste Salt
- few Karuvepillai / Curry leaves
- 1 ½ tablespoon Butter
- to deep fry Oil
Instructions
To make the urad dal flour / ullutham Maavu -
- Ullutham podi is used for many savory snacks during the festival season. If you are planning to make couple of dishes involving this, I would suggest that you make a big batch and store in an air tight container.
- To get ¼ cup of urad dal flour, I used about ½ cup of Urad dal.
- Fry the urad dal until brown and let it cool down.
- Grind it to a very smooth powder and sieve it.
- Again grind the coarse remaining dal and sieve it again. Use the fine powder to make the thattais.
To make Roasted Gram Flour / Pottu kadalai Maavu -
- Slightly warm the pottu kadali/roasted gram (for about 2-3 mins).
- Cool it down and grind it to a smooth powder. Sieve it and use the fine powder in the recipe.
To Make the Thattai Dough -
- Soak the Bengal gram dal for about an hour.
- Roast the rice flour until it is hot and aromatic. The rice flour does not have to change color, but it has to be hot to touch. Sift the roasted flour and place it in a large bowl.
- Add all the flours, drained Bengal gram dal, coconut, salt, red chili powder, sesame, asafetida and chopped curry leaves to the same bowl. Mix it well.
- Now add the butter and using your hands mix everything well until it resembles bread crumbs.
- Slowly sprinkle water to this mixture and bring it all together to form smooth dough.
How to shape the Thattai -
- Spread a large, clean cotton cloth in the counter top. I use a cotton veshti.
- Make small balls (as big as key limand place it between 2 parchment paper. You can also use a thick plastic sheet and grease it to shape the thattai.
- Use your fingers initially to flatten and then using a flat bowl or your palm flatten it entirely to form a thin disc.
- Place the shaped thattai on the cotton cloth.
- Do the same with the rest of the dough and leave them on them cloth until they are ready to fry. Doing this ensures that all the excess moisture is dried from the thattai, that results in crispy thattai.
- Prick few holes on the thattai with a fork. This ensures that the Thattai does not puff up when frying.
- In the meantime, heat oil in a wide pan. Once the oil is heated through, lower the heat to low. Slowly slide the shaped and dried thattai into the oil.
- Depending on the size of the pan, you can fry 3 to 4 thattai at the same time.
- Slightly increase the heat and fry them until light brown. Remove it on a paper towel and then transfer it to a container. Repeat the same for the rest of the dough.
- Once cooled completely, store them in an air tight container.
Notes
Tips to make perfect Thattai
- Roasting and sifting the flours is very important to make smooth thattai. Do not skip this step.
- Spread the shaped thattai on a cotton cloth to dry it a bit before deep frying.
- Pricking the shaped thattai is very important to make sure that it does not puff up when frying.
- Fry the thattai is low to medium heat to ensure that it cooks evenly.


Very clearly instructed. Gives confidence to make it. Thanks a ton
Thanks! Do let me know how did the recipe work.
Those thattai;s look incredible sandhya!! love thattai and i have failed terribly making them!!!! will try this diwali your way, hopefully get it properly!!!
WOW so crispy and flavorful snacks !! These must be perfect to go with evening chai 😉 Love to try this traditional South Indian snack Sandhya 🙂
A very new recipe for me and looks quite interesting. Would surely love to give it a try before the Diwali. Thanks for the share.
I too make thattai for krishna jayanthi. Yours looks so crispy and crunchy. Would love to munch it anytime
These thattai look so crunchy and tasty. Ours is something similar kind, we make as nipattu, but the ingredients are slightly different. I would like to try it sometime.
Ah, our Indian style crackers which are wholesome and packed with flavours. Really like your idea to use flat bottom katori to press the thattai.
I am a big fan of thattai. Just love it. Yours looks so perfect and amazing. Never tried at home. Now will definitely try . Thanks for sharing such detailed post
What a fabulous share Sandhya! Your thattai look so flavorful and I like the step by step photos you have provided making it easy to follow the recipe!
Thattai is one such irresistible snack to munch on. Somehow I never had courage to try this recipe as I always felt I might mess up with ratio or end up with hard thattai. I think I should try this recipe sometime. Yours look so crunchy and delicious. Thanks for sharing.....
We love Thattai very much! Perfect tea time snacks. You have explained very well, looks so delicious
Traditional snacks always remind us our childhood memories...how beautifully step by step you have explained the process and they look so crispy
Hey Sandhya the thattai looks absolutely delicious with crispy texture. I have never tried making this.
Thank you for your detailed recipe.
In my home we all very fond of this snack. My mom makes it exactly like how you made. I love it. I have been meaning to try this recipe. After seeing your well-explained recipe. I wanted to try soon. Thanks for sharing 🙂
Hi Sandhya
very detailed explanations. Looks very yummy.
I did it. Followed your recipe. Waiting for krishna . Will taste in the evening. Thankuuuuu
Thanks Mythraye! How was it?
Hi sandhya akka,
Thanks for the detailed clearification for my query.
I followed your recipe exactly step by step and made thattais for the first time(tried with halved the recipe of yours) & the thattais came out awesome.It is crunchy and super perfect that we enjoyed having it and shared it with neighbour friends and there was nothing left.Going to make next weekend again.
Onething is i haven't got perfect round shape like yours and i think it will come by practice ,but the thattai taste was marvellous that we totally loved them.
Thanks for the recipe & keep posting more recipes.It really inspires to try more recipes from ur webspace.
Haasini
Hi Haasini,
Thank you so much for your feedback. I am so glad the recipe worked well for you. Do post your pictures on my FB page if you get a chance, so other people will get a chance to see it.
My FB page link is https://www.facebook.com/pages/My-Cooking-Journey/337829106227175. You could also follow me through Google plus, if you are not doing so already to get the latest updates from my side. Thanks again for trying out my recipes.
Cheers
Hi Sandhya akka,
Mouthwatering recipe & feel like grabbing it from the picture.
As usual very very clear instructions given by u that we cannot make mistakes anywhere while making it.I wish to make it on this weekend.
To get 1/2 cup of roasted gram flour,about how many cups porikadalai u used?
To flatten thattai on the muslin cloth,the cloth should be wet or dry & i have no idea.
Never made thattais before,expecting ur reply for my doubts & i let u know the outcome once i am done.
Thanks,
Haasini
Hi Haasini,
Thanks for your comments.
I would use a little more than half cup of porikadalai to get half a cup of flour.
The cloth has to be dry when flattening the thattai. This step is mainly to remove all the extra moisture from the dough, so that the thattai does not crackle too much in oil.
Hope your questions were answered. Do try it and let me know.
Thanks
Wow! my favourite.
Healthy Food for Healthy Kids Series- Wraps and Rolls.
https://www.asiyama.blogspot.com/2012/11/healthy-food-for-healthy-kids-event.html
Hi Sandhya,
Thattai looks so crispy and yum.First time to your space thru SNC .Happy to follow you:)...Will be gald if you follow back...
Awesome recipe thanks for linking with my event
fabulous and aggressive presentation sandhya,your way of explanation was really extraordinary,keep going.
wow wonderful presentation sandhya
sharanya
Thanks Sharanya !
Sandhya
my favorite thattai!!! love this.. my mom is an expert in this... you have made it so good!!
Sowmya
Ongoing Event - CWF - Whole Wheat Flour
Thanks Sowmya! My first time making this and it came out lovely 🙂
Sandhya
wow...neatly explained..
oh my i have never had this and this looks as difficult as adhirasam except u dont hv to make sugar or jaggery syrup
looks really good sandhya
squash halwa a guest post
Meena Aunty, Thank you so much 🙂 It is not a complicated process, does not involve any grinding or making syrup. Cannot go wrong. Ingredients are somewhat similar to what we use in making chakli.
Sandhya